So, this is all about squaring up the legs, doing the layout of the joinery and then cutting the dovetail and tenon. Things went OK really, that is to say I did not have to toss out any wood and start over again. But I had my share of problems as you are about to see leaving me with more work to do before I layout the matching mortise and dovetail on the bench top.
I began by placing a 35" piece of 6x6 in my leg vise and started planing all 4 sides flat and square to each other. Things were going smooth really but I noticed that on every side of the first leg I had a significant amount of planing to do at the same spot. And then when I got to the last surface it was impossible to make it square to both adjacent sides. Hmmm..... Then it hit me. I neglected a step. A step that I once made a special tool to perform and I failed to use it. Take a look at the photos below.
The two sticks in the above photo are called winding sticks. They help you see if the board you are working on has a twist in it. The simple way to tell you how they are used it to show you really so take a look a the next photo.
You sight down the front stick and look to see if the back stick is parallel to it. If not, like this photo shows the wood has a twist in it. Because I did not check this first, I had to go back and remove the twist by planing down the rear right side of the leg until the winding sticks looked like the next photo.
Nice! the twist is gone, but I still have to re-plane all the other faces of the leg because I had now screwed them all up by squaring them to a twisted surface. Eventually I got all 4 legs nice and square. Now lets talk about layout. Next photo please.
Here's a shot of the layout on the first leg. I put the blue hash marks on all the waist material to make it easy to see where the tenon and dovetail go. This is however the easy part. Next I try my hand at cutting the tenon and dovetail. I have cut tenons before, and I have cut dovetails a few times. But never this big and never on the same piece of lumber. Lets take a look at the process.
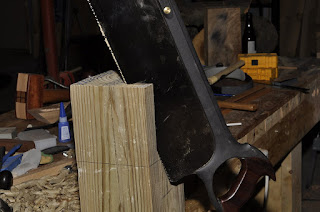
There is an old saying that is used to help people who use hand saws to cut good and straight when attempting this kind of stuff that goes like this. "Don't cut what you can't see". Here I have followed a line that is facing me as I cut (you can't see it in this photo). I also cut along the top layout line because I could see it as well. But I did NOT do any cutting on the opposite side that I can not see. Don't cut what you can't see.
Then you turn the piece around and cut down the other side of the dovetail cheek. This technique is easier said than done, but it is still great advice.
This is how I removed the waist material between the dovetail and the mortise. It's a lot like removing waist from a regular dovetail joint. You use a mallet (which I also made myself) an chisel to make a cut on the fit line at the bottom of the joint then drive the chisel straight down from the top to cut a chunk out. You do this on one side until you reach the middle. then flip the leg over and repeat.
So here is the finished product. Well, it still needs work because I am less than perfect, but you know what I mean. As you can see I was a tad off on the left side dovetail cheek by about 1.5 degree. That is no big deal, how ever I also goofed up on the tenon and that needs to be fixed. I got off line just a tad cutting one side thicker than the other. Oops. Hopefully, each of the other three legs will come out just a little better. The last on should be perfect right? lol.


