Showing posts with label Hardwood. Show all posts

Tuesday, November 15, 2016

In my last post I talked about gluing up the legs for my Roubo bench from 2x6 lumber, well, I found some 6x6 pine post lumber that will work great so I'm going with that to save me all the work of doing a glue up of other materials.

So, this is all about squaring up the legs, doing the layout of the joinery and then cutting the dovetail and tenon. Things went OK really, that is to say I did not have to toss out any wood and start over again. But I had my share of problems as you are about to see leaving me with more work to do before I layout the matching mortise and dovetail on the bench top.

I began by placing a 35" piece of 6x6 in my leg vise and started planing all 4 sides flat and square to each other. Things were going smooth really but I noticed that on every side of the first leg I had a significant amount of planing to do at the same spot. And then when I got to the last surface it was impossible to make it square to both adjacent sides. Hmmm..... Then it hit me. I neglected a step. A step that I once made a special tool to perform and I failed to use it. Take a look at the photos below.


The two sticks in the above photo are called winding sticks. They help you see if the board you are working on has a twist in it. The simple way to tell you how they are used it to show you really so take a look a the next photo.


You sight down the front stick and look to see if the back stick is parallel to it. If not, like this photo shows the wood has a twist in it. Because I did not check this first, I had to go back and remove the twist by planing down the rear right side of the leg until the winding sticks looked like the next photo.


Nice! the twist is gone, but I still have to re-plane all the other faces of the leg because I had now screwed them all up by squaring them to a twisted surface. Eventually I got all 4 legs nice and square. Now lets talk about layout. Next photo please.


Here's a shot of the layout on the first leg. I put the blue hash marks on all the waist material to make it easy to see where the tenon and dovetail go. This is however the easy part. Next I try my hand at cutting the tenon and dovetail. I have cut tenons before, and I have cut dovetails a few times. But never this big and never on the same piece of lumber. Lets take a look at the process.


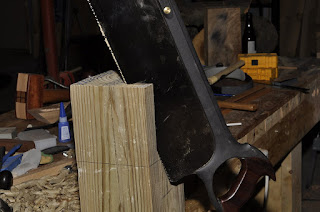
There is an old saying that is used to help people who use hand saws to cut good and straight when attempting this kind of stuff that goes like this. "Don't cut what you can't see". Here I have followed a line that is facing me as I cut (you can't see it in this photo). I also cut along the top layout line because I could see it as well. But I did NOT do any cutting on the opposite side that I can not see. Don't cut what you can't see.


Then you turn the piece around and cut down the other side of the dovetail cheek. This technique is easier said than done, but it is still great advice.


This is how I removed the waist material between the dovetail and the mortise. It's a lot like removing waist from a regular dovetail joint. You use a mallet (which I also made myself) an chisel to make a cut on the fit line at the bottom of the joint then drive the chisel straight down from the top to cut a chunk out. You do this on one side until you reach the middle. then flip the leg over and repeat.


So here is the finished product. Well, it still needs work because I am less than perfect, but you know what I mean. As you can see I was a tad off on the left side dovetail cheek by about 1.5 degree. That is no big deal, how ever I also goofed up on the tenon and that needs to be fixed. I got off line just a tad cutting one side thicker than the other. Oops. Hopefully, each of the other three legs will come out just a little better. The last on should be perfect right? lol.

Thursday, November 10, 2016

Roubo Workbench Top Is Flat and Square!

I have nearly finished the planing on my workbench top, and I timed the ends off with a hand saw to bring it down to 6 feet long and square up the ends. The top is now flat, but still has some marks I need to plane out.


I was quite careful about sawing off the ends of the bench top, even using a speed square to check the saw blade. The results were OK, but not perfect. The over all bench in now square with in 1/32" and I am quite happy with that. However, the ends, while square across the width of the top are not very square in the thickness because the saw blade wanted to wonder despite my best efforts to keep it straight. Damn! It's not the end of the world but it will make mounting a end vise more difficult.


The photo above should clear up what I was saying about the ends being out of square through the thickness of the top. The line across the top however is nice and square.


So there it is 6 foot long and 20 1/2 inches wide. The next step is to start constructing the legs. I am unable to find any beam or post 6" X 6" at a local lumber yard. So, I have decided to laminate the legs using 2 x 6 pine boards. What a hassle, but it must get done so I can begin to cut the tenon and dovetail that secure the legs to the top. Once the legs are attached to the top, I will do a little more planing to remove saw marks from the top of the bench. I'm not going to do to much work on the top because the grain is not straight, and is very difficult to plane. I have been getting lots and lots of tear out on the top that I don't like, but there is not much I can do about it. Lucky 4 me, this is a workbench not a dining room table so some roughness on the surface is acceptable. 

Friday, October 14, 2016

The Time Has Come

For several years now I have dreamed of building a workbench to the specifications found in the five volume woodworking masterpiece L'Art Du Menuisier written by the french cabinetmaker and author Andre Roubo in the 18th century. Roubo's description of the bench is quite specific leaving little to the imagination. It is a simple design but stout and efficient in every way. The bench top is 5” thick, 20” wide, 6' long and is made of one solid slab of hardwood such as Elm, or Oak. The length of the legs vary according to how tall or short the craftsman using the bench is. Like the top, the legs are stout measuring as thick as 6” X 6”. Each leg attaches to the top using both a through tenon and a dovetail which is flush with the edge of the top. Wedges are driven into slight gaps in the tenon ensuring that the joint cannot come apart once made up.

The time has come at last for me to build my own version of the Roubo bench. I was not at all sure I could find the raw material to make such a bench at first. After all you don't find many slabs of hardwood with the above mentioned dimensions at the local home improvement center do you. Then while scouring Craigslist for suppliers I stumbled across Mark Sundermeier of American Arborist Wood Products in Omaha Nebraska. Mark was not just helpful he was genuinely interested in my project and agreed to cut me a custom slab of Ash specific to my task. If you have a need for high end wood products of any kind do yourself a favor and contact the American Arborist Wood Products by clicking here

It will be mid November before I have the money to pay for my slab of Ash and take it home. Until then, I will blog the details of my workflow for the bench as well as some of the tools I will be using for the build. In the mean time leave a comment if you like or ask me questions.


Bill